|
Help Topics |
|
|
|
|
|
Help Topics |
|
|
|
|
The Marine Tank Program shares the same windows interface under Windows 95 and Motif. The portable Windows framework was built with the "wxWindows" GUI library, version 1.68B. For more information on wxWindows visit the wxWindows Home Site at: http://web.ukonline.co.uk/julian.smart/wxwin/
The program consists of a main menu and a text window. All database operations are performed through the main menu.
![]()
The program's text window is used by the program to display a welcome message each time the program starts and echo the results of each database operation performed. Welcome messages are text files used to display information about this application. You can use any text editor to change the program's welcome message.
When the program is executed for the first time a new database file and index file will be created. The program will automatically open its associated data file and index file every time after that. The program configuration file is used to point the program to the location of the database and establish user access rights. If the database files cannot be found the program will create empty ones in its working directory.
The path to the configuration file can be set by an environmental variable if the configuration file resides in a different directory then the executable. Under UNIX a copy of the configuration file can be placed in each users directory to create a custom profile. If you want to specify a specific database when the program starts type the program's name followed by the name of the database with no file extension: MyDbase mydbfile
The program's configuration file is used to load configurable parameters from a text file. You can use any text editor to modify the configuration file.
#######################
#### Start of File ####
#######################
# ---------------------------------------------------------------
# User configuration file
# ---------------------------------------------------------------
# Set the path to this file in the environment or leave this file
# in the program's working directory.

# ===============================================================
# Database file to open when application starts
# ===============================================================
# Do not use any file extensions when creating or opening file.
# Both data and index will share the same name with different
# file extensions. The data file will have a .pod extension and
# the index file will have a .btx extension.
# ===============================================================
# Database file to open when application starts
DBFileName=..\db_files\mtank
# ===============================================================

# ===============================================================
# Enable/Disable Admin user privileges
# ===============================================================
# Valid entries are FALSE the disable or TRUE to enable. If
# enabled the user will be allowed to add, change, or delete
# entries. Will default to FALSE if no valid entry is found.
# ===============================================================
AdminUser=TRUE
# ===============================================================

# ===============================================================
# Set the path to a welcome message
# ===============================================================
WelcomeMessageFile=welcome.txt
# ===============================================================

# PostScript Setup
# ===============================================================
# Name of the document header
psDocumentName=Marine Water Test

# Maximum string length for each cell
CellLength=19

# Font size for the item bar and the cells
FontSize=7

# Page orientation: LANDSCAPE or PORTRAIT
Orientation=PORTRAIT

# Paper size: LETTER, LEGAL, TABLOID, A3, or A4
PaperSize=LETTER

# Font types: COURIER, COURIER_BOLD, COURIER_OBLIQUE, or COURIER_BOLD_OBLIQUE
ItemBarFont=COURIER_BOLD_OBLIQUE
CellFont=COURIER
# ===============================================================

# Default values for wxWindows MSW style printing
# ===============================================================
# Name of the document header
mswpDocumentName=Marine Water Test

# Maximum lines per page (Assuming landscape on 8.5" x 11" paper)
mswpLinesPerPage=46

# Maximum string length for each cell containing the object's data
mswpCellLength=21

# Font size for the item bar and the cells
mswpFontSize=9

# Left margin in logical units (Approximately 20 per inch)
mswpLeftMargin=20

# Page orientation: LANDSCAPE or PORTRAIT
mswpOrientation=PORTRAIT

# Font family type for item bar and object data. Valid entries are:
# SWISS, ROMAN, DECORATIVE, MODERN, SCRIPT, SYSTEM
mswpFont=SWISS
# ===============================================================

# ---------------------------------------------------------------
#####################
#### End of File ####
#####################
The program will search for its configuration file in its working directory first and then search the environment. If the program cannot find its configuration file or a configuration file does not exist, it will substitute the configurable parameters with default values set within the source code.
There are two levels of access for the database, administrative access and a general access. Access levels are configured in the program's configuration file. If an access level is not specified the program will default to general access. Each time the program starts it will display your current access level on the program's status line.
![]()
If you do have admin privileges the program's name will be displayed on the status line when the program starts. At any time, you can select the "Access Rights" option from the Help Menu to display your current access rights.
General Access:
General access grants you read-only privileges. You do not have the capability to modify the database with an add, change, delete, import, or merge operation. General access denies you the right to create new database files. If you try to create a new database with general access the program will flag you with a file creation exception and terminate.
Administrative Rights:
Administrative access grants you read and write privileges. You will be allowed to modify the database, assuming that you have read and write privileges to the actual database files. If you give yourself ADMIN privileges and do not have read and write access to the database files, the program will flag you with an error and terminate. ADMIN privileges does not give you exclusive rights to the database.
Exclusive Rights:
Exclusive rights, means that your instance of this program is the only one running. If more then one version of this application is using this database, either over the network or on the same computer, you do not have exclusive access to the database. Any modifications made to the database without exclusive rights will flag the other users with an access violation. An access violation means that the database has been modified and your version is no longer valid. If you receive an access violation, exit the program and restart it.
![]() FILE MENU
FILE MENU
The File menu allows you to select various options to perform file operations on the open database.
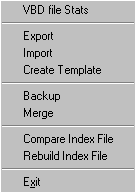
VBD File Statistics:
Select the "VBD File Statistics" option to display detailed file information about the open database. This information is used to analyze and troubleshoot VBD files. File statistics for both the data file and the index file will be displayed in the program's text window.
----- Static information -----
File Name: u:\db_files\mtank\mtank.pod (VBD file currently open)
Signature: VBDFILE (VBD file signature)
Revision Letter: A (VBD file manager revision letter)
Version Number: 1027 (VBD file manager version number)
File Header Size: 28 (size of the VBD file header in bytes)
Block Header Size: 16 (size of the Variable Block headers in bytes)
Static area size: 0 (size of VBD static storage area in bytes)

----- Dynamic Information -----
File status Byte: Good Open Read/Write (status of this file)
Free Space: 24068 (file address of the next free block)
End of File: 39830 (end of file marker)
Heap Start: 28 (file address where all block allocation starts)
Highest Block: 39695 (file address of the last block)
Total Blocks: 385 (total number of blocks, including deleted ones)
Deleted/Removed: 179/17 196 (total number of deleted and removed blocks)
Number of objects: 189 (total number of blocks in use)
NOTE: The data file does not require any static storage space in its VBD file, so none is allocated. Static storage refers to an area of the VBD file that will not be affected by any of the file allocation routines. The index file statistics, not displayed here, should always have a static storage area allocated. For more information see the VBD File Manager class and the B-tree class.
Export:
Select the "Export" option to export the entire database or the display list to a text file delimited by tabs. The exported text files can be imported into other applications such as Microsoft Excel.
When this menu option is selected, a File Selection Box will appear. Either select or enter the name of the file to export the database into. After selecting or entering the file name click on the Open button under Windows 95, or the Ok button under Motif. If the file does not exist a new file will be created. Pre-existing files will be overwritten.
Import:
Select the "Import" option to import a text file delimited by tabs into this database. The import file must contain the correct number of strings per line, according to the format specified by the Export option or the Create Template option. NOTE: You must have exclusive rights to the database to perform an import operation. See the Access Rights section.
When this menu option is selected, a File Selection Box will appear. Either select or enter the file name to import. After selecting or entering the file name click on the Open button under Windows 95, or the Ok button under Motif.
The import function parses the text file line by line searching for text strings separated by tabs. If there is not enough items on a line to complete an entry, the import function will flag you with an error and skip this entry. If an entry is already in the database, the import function will give you the option to update this entry, skip this entry, or update this entry and all others without prompting. After completion, the import function will report the number of new items that were imported and the number of items that were updated.
Create Template:
Select the "Create Template" option to create a template text file used to create import files. When the file is imported, the template information is discarded.
When this menu option is selected, a File Selection Box will appear. Either select or enter the name of the file to write the text template to. After selecting or entering the file name click on the Open button under Windows 95, or the Ok button under Motif. If the file does not exist a new file will be created. Pre-existing files will be overwritten.
Backup:
Select the "Backup" option to backup the contents of this data file to a new data file. NOTE: Since the index file can always be rebuilt by selecting the Rebuild Index File option, only the data file will be copied. Backup copies of the database should be made regularly in case of disk failures or file corruption.
When this menu option is selected, a File Selection Box will appear. Either select or enter the file name to copy this database into. After selecting or entering the file name click on the Open button under Windows 95, or the Ok button under Motif. If the file does not exist a new file will be created. Pre-existing files will be overwritten.
Merge:
Select the "Merge" option to merge the contents of another database with this one. Merges are used to update the database when other copies of it exist on other systems, such as laptop computers. NOTE: You must have exclusive rights to the database to perform a merge operation. See the Access Rights section.
When this menu option is selected, a File Selection Box will appear. Either select or enter the file name of the merge file. After selecting or entering the file name click on the Open button under Windows 95, or the Ok button under Motif.
The merge function checks each variable block header for the correct class identification numbers before importing a new object. This ensures that no objects from another VBD file will be imported into this database. If an object with correct class ID is already in the database, the merge function will give you the option to update this entry, skip this entry, or update this entry and all others without prompting. After completion, the merge function will report the number of new objects that were imported and the number of objects that were updated.
Compare Index File:
Select the "Compare Index File" option to compare each object in the data file with its entry key in the index file. The result of the test will be echoed in the program's text window. If the test fails, rebuild the index file with the Rebuild Index File option and copy the new index file over this one.
Index files are used to locate objects in the data file by associating each object's entry key with a file address. Each new object added to the database is assigned a unique key name. The key name and the object's file address are then stored in the index file. If all the objects in the data file do not have valid key entries in the index file, either the index file or the data file could be corrupt. If the compare index file function still fails after the index file is rebuilt and installed, the data file is corrupt. A corrupt data file can be restored from a backup copy or rebuilt with the VBD file Debug Utility.
Rebuild Index File:
Select the "Rebuild Index File" option to rebuild the index file. Index files are used to locate objects in the data file. Each index file is unique and can only be rebuilt by the application that created it. For more information see the POD manger and the Persistent base class.
When this menu option is selected, a File Selection Box will appear. Either select or enter the name of the new index file. After selecting or entering the file name click on the Open button under Windows 95, or the Ok button under Motif. If the file does not exist a new file will be created. Pre- existing files will be overwritten.
NOTE: The rebuild function will not allow you to overwrite the existing index file, even though it no longer contains valid entry keys. After the index file is rebuilt, you have to exit the program and copy the new index file over the existing one:
C:>copy c:\temp\new_file.btx u:\db_files\mtank\mtank.btx (under Windows 95)
% cp /tmp/new_file.btx /dbase/db_files/mtank/mtank.btx (under UNIX)
Exit:
Select the "Exit" option to exit the program.
![]() EDIT MENU
EDIT MENU
The Edit menu is used to perform clipboard operations under Windows 95 and Motif.
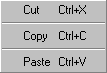
Cut:
Select the "Cut" option to cut a block of text and place it on the Windows clipboard. You can perform a cut operation outside of the program's text window by pressing Control-X. This allows you to cut and paste text during an add or change operation. Text placed on the clipboard by a cut or a copy can be pasted into another applications.
Copy:
Select the "Copy" option to copy a block of text and place it on the Windows clipboard. You can perform a copy operation outside of the program's text window by pressing Control-C. This allows you to cut and paste text during an add or change operation. Text placed on the clipboard by a copy or a cut can be pasted into another applications.
Paste:
Select the "Paste" option to paste a block of text from the Windows clipboard. You can perform a paste operation outside of the program's text window by pressing Control-V. This allows you to paste text during an add or change operation.
![]() DATABASE MENU
DATABASE MENU
The Database menu is used to perform all database display, insert, change, and remove operations.

Display:
Select the "Display" option to display the database object by object. When selected, the display panel will appear and display the first object. The display panel contains a series of buttons that allows you to manipulate the objects being displayed.
![]()
- Click on the Next button to advance to the next object in sequence.
- Click on the Prior button to display the object prior to this one.
- Click on the Change button to change this object.
- Click on the Close button to close the display panel.
- Click on the Remove button to delete this object.
- Click on the Analyze button to display test results in the program's text window.
NOTE: You must have exclusive rights to the database to perform a change or remove operation. See the Access Rights section.
Add:
Select the "Add" option to add new objects to the database. NOTE: You must have exclusive rights to the database to perform an add operation. See the Access Rights section. When selected, the add panel will appear. From here enter the date of the entry and its associated fields. All dates must be entered in a month, day, year format using a two-digit month, a two-digit day, and a four-digit year. After entering the data, use the add panel buttons to process it. You can paste text in the entry fields from the Windows clipboard by pressing Control-V after a cut or copy operation.
![]()
- Click on the Add button to add and display test results in text window.
- Click on the Cancel button to abort this entry and clear the add panel.
- Click on the Close button to close the add panel.
- Click on the Revert to display the previous object that was entered.
The date field of the object, entered in the first entry field, must be unique and can only be entered once. If the object already exists in the database the add function will flag you with an error. NOTE: The database will support duplicate objects, but this feature was not implemented in this program.
Change:
Select the "Change" option to a change an object in the database. NOTE: You must have exclusive rights to the database to perform a change operation. See the Access Rights section.
When selected, the change panel will appear. From here, enter the object's date field and click on the Search button. All dates must be entered in a month, day, year format using a two-digit month, a two-digit day, and a four-digit year. After changing you must click on the Commit button to enter the changes.
If the object is found the Commit button will be enabled. You are not allowed to enter a duplicate key name for an object. NOTE: The key name restriction is enforced to prevent duplicate names from appearing in the database. The database will support duplicate names, but this feature was not implemented in this program.
After changing the data, use the change panel buttons to process it. You can paste text in the entry fields from the Windows clipboard by pressing Control-V after a cut or copy operation.
![]()
- Click on the Search button to find the object in the database.
- Click on the Commit button to commit the changes.
- Click on the Cancel button to abort this change and clear the change panel.
- Click on the Close button to close the change panel.
- Click on the Revert to display the previous object selected to change.
![]() FIND MENU
FIND MENU
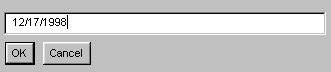
The Find menu is used to find objects in the database. A search can be performed on the object's date file or comment field. All dates must be entered in a month, day, year format using a two-digit month, a two-digit day, and a four-digit year. Always use forward slashes to separate month, day, and year: 12/17/1997
![]()
After selecting you will be prompted to enter a date or comment string to search for. You can paste in the text from the Windows clipboard by pressing Control-V after a cut or copy operation. After entering the string, click on the Ok button to execute the search operation.
Two types of searches can be performed, a plain search or a wild card search. A plain search is not case sensitive, but it requires you to enter the complete string.
The plain search will find a single match if searching by date or will find every match of the complete string if searching on the comment field. After a plain search or wildcard search, you will be given the option to display the object(s) that matched. If no matches are found, the program will alert you with a message stating that no matches were found.
A wildcard search is performed by entering the wildcard character "*" anywhere in the entry. Wildcard searches are case sensitive, but only require you to enter a piece of the data.
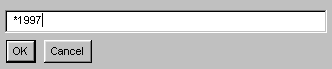
The wild card search will find every occurrence in the specified field.
NOTE: To print or export the objects displayed after a find operation, minimize the display panel and select one of the print options or the export option.
![]() PRINT MENU
PRINT MENU
The Print menu is used to print the entire database or the display list to a selected printer, a PostScript file, or a text file. NOTE: Under Motif, you will only have the option to print to a PostScript file or a text file.
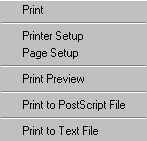
Print:
Select the "Print" option to print the database to a selected printer, using the Windows print manager.
Printer Setup:
Select the "Printer Setup" option to configure the printer before printing. NOTE: If you select landscape mode in the Page Setup panel, you must setup this printer to print in landscape mode. To set the printer for landscape mode, click on the Properties button ![]() in the printer dialog box and then find the page orientation group box. Select Landscape and click on Ok.
in the printer dialog box and then find the page orientation group box. Select Landscape and click on Ok.
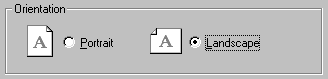
Page Setup:
Select the "Page Setup" option to set various page parameters before previewing or printing the document. The default page parameters are manually set in the program's configuration file. All the page parameters will revert to the default settings each time the program is executed. After changing or defaulting to the configuration file settings, you must click on the Accept button to enter the changes.
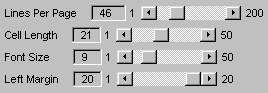
- The Lines Per Page slider sets the number of lines per page from 1 to 200.
- The Cell Length slider sets the maximum number of field characters that will be printed.
- The Font Size slider sets the font size from 1(smallest) to 50(largest).
- The Left Margin slider sets the left margin in points (20 points equal one inch).
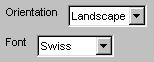
- The Orientation choice box is used to select Portrait or Landscape mode.
- The Font choice box is used to select a desired font family.
NOTE: If you select landscape mode, you must setup this printer to print in landscape mode. To set the printer for landscape mode, click on the Properties button ![]() in the printer dialog box and then find the page orientation group box. Select Landscape and click on Ok.
in the printer dialog box and then find the page orientation group box. Select Landscape and click on Ok.
After changing the page parameters, use the panel buttons to process the changes.
![]()
- Click on the Close button to close this panel.
- Click on the Accept button to enter the page settings.
- Click on the Cancel button to cancel and revert back to the previous settings.
- Click on the Default button to revert to the default settings.
Print Preview:
Select the "Print Preview" option to preview a document before printing it. The print preview panel allows you to zoom in or out on the selected page. You can also move back and forth between the pages.
![]()
Print to PostScript File:
Select the "Print to PostScript File" option to print the entire database or the display list to a PostScript file. All the PostScript printing parameters are loaded from the program's configuration file each time a document is printed.
When this menu option is selected, a File Selection Box will appear. Either select or enter the name of the PostScript file to create. After selecting or entering the file name click on the Open button under Windows 95, or the Ok button under Motif. If the file does not exist a new file will be created. Pre-existing files will be overwritten.
The PostScript file must be manually sent to a PostScript printer after it is created:
C:>type c:\temp\mtank.ps > LPT1 (under Windows 95)
% lp -d hplj mtank.ps (under SYSV UNIX)
Print to text file:
Select the "Print to text file" option to print the entire database or the display list to a text file.
When this menu option is selected, a File Selection Box will appear. Either select or enter the name of the text file to create. After selecting or entering the file name click on the Open button under Windows 95, or the Ok button under Motif. If the file does not exist a new file will be created. Pre-existing files will be overwritten.
![]() VIEW MENU
VIEW MENU
The View menu is used to clear the program's text window. The text window is used to display the result of all database operations and database statistics.
![]() HELP MENU
HELP MENU
The Help menu is used to display the program's version number and your user access rights.
![]()
About:
Select the "About" option to display this program's name version number.
Access Rights:
Select the "Access Rights" option to display your current user access rights.